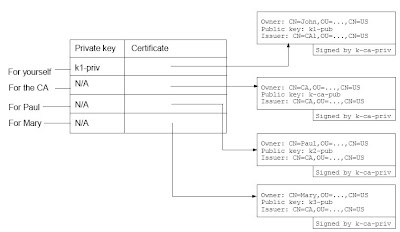
In order to use PKI, typically you should have a private key for yourself (see the diagram below), a certificate for yourself so that you can send to others, a certificate for each person that you need to send something confidential to (e.g., Paul and Mary) and the public keys of the CA's that you trust. For the public key of the CA, you don't directly store its public key. Instead, you store its certificate which contains its public key. But who issued that certificate to it? It was issued by itself (signed by its own private key)
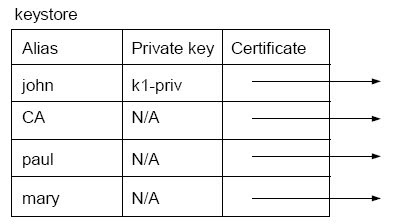
Such a table is called a “keystore” in Java (see the diagram below). A keystore is stored in a file. In addition, each entry in the table has a name called the "alias" of the entry. This way you can, e.g., tell the software to sign a particular message using the private key in the “john” entry (yourself), or encrypt the message using the public key in “paul” entry. Without the alias you will have to use the DN to refer to an entry.
 Generating a key pair
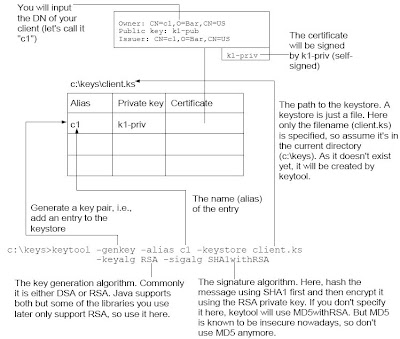
In order to generate a key pair, you can use the keytool program in JDK. For example, if your JDK is in c:\Program Files\Java\jdk, then you can find keytool.exe in the bin sub-folder (i.e., c:\Program Files\Java\jdk\bin). For convenience, let's add c:\Program Files\Java\jdk\bin to the PATH. Next, create a folder "c:\keys" to hold the keys and change into there. Now, generate a key pair:
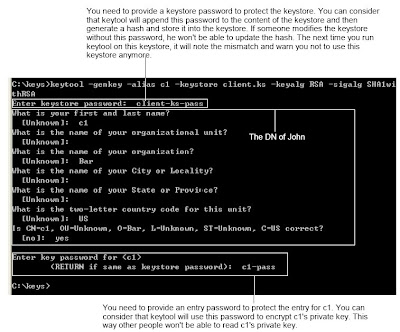
c:\keys>keytool -genkey -alias c1 -keystore client.ks
-keyalg RSA -sigalg SHA1withRSA
To verify that the entry has been added, you can list the entries:
c:\keys>keytool -list -keystore client.ks
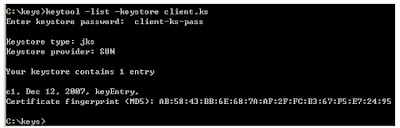
You can see that both the "Owner" and the "Issuer" are set to the DN of c1. It shows that it is indeed a self-signed certificate. Having a self-signed certificate is not useful. You need to ask a CA to sign it. To do that, generate a certificate request first.
c:\keys>keytool -certreq -alias c1 -keystore client.ks -file c1.csr
It will generate a cerificate request for the entry named "c1" and put the certificate request into the file "c1.csr". Run it:

Now it has put the certificate request into c:\keys\c1.csr. You need to send to a CA. In real life, you should send it to VeriSign or some well known CA to get a certificate (of course a payment is required). Here you'll setup your own CA.
Setting up a CAGo to http://www.openssl.org/related/binaries.html to download the Windows version of OpenSSL. Suppose the file is Win32OpenSSL-v0.9.8a.exe. Login as the Administrator and run it. Follow the instruction to complete the installation. Suppose that it has been installed into c:\OpenSSL. To make it easier to run, add c:\OpenSSL\bin to the PATH.
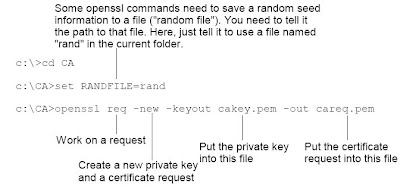
Next, create a folder say c:\CA to contain the files of the CA. Then create a private key for the CA itself.
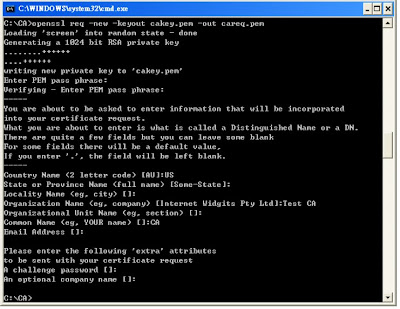
openssl req -new -keyout cakey.pem -out careq.pem
Next, generate a self-signed certificate for it
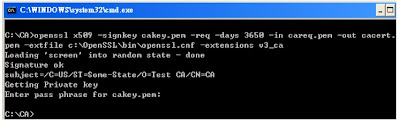
c:\CA>openssl x509 -signkey cakey.pem -req -days 3650 -in careq.pem
-out cacert.pem -extfile c:\OpenSSL\bin\openssl.cnf -extensions v3_ca
openssl.cnf may not exist, so you can run the command like this
c:\CA>openssl x509 -signkey cakey.pem -req -days 3650 -in careq.pem
-out cacert.pem
Run it and enter "ca-pass" as the password for the CA key.
Now you're about to use this CA to sign the certificate request from John (john.csr). However, before that, you need to note that when a CA issues a new certificate, it will put a unique serial number into that certificate. So you need to tell OpenSSL what is the next serial number to use. To do that: To sign c1's certificate request: Store the string "02" into a file serial.txt.
echo 02 > serial.txt
Note that the "0" is necessary. Using "2" will NOT work because OpenSSL expects a hexadecimal number that contains an even number of digits.
To sign c1's certificate request:
c:\CA>openssl x509 -CA cacert.pem -CAkey cakey.pem
-CAserial serial.txt -req -in c:\keys\c1.csr -out c:\keys\c1.cer -days 1095
Run it and enter "ca-pass" as the password for the CA key:
 Importing the certificate into the keystore
Now you have got the certificate in c1.cer, you can import it into the keystore. However, before doing that, you must first import the certificate of the CA itself into your keystore as a trusted CA certficate, otherwise it will refuse to import John's certificate. To do that:
c:\keys>keytool -import -alias testCA -file c:\CA\cacert.pem -keystore client.ks
Run it:
Note that it asked you to trust this certificate or not. This is a very important decision.
If you trust this certificate as a CA certificate, you will trust all certificates issued by it.Next, add John's certificate to the keystore to replace his self-signed certificate. This is also done using the -import option.
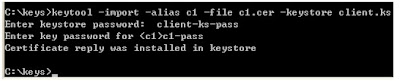
c:\keys>keytool -import -alias c1 -file c1.cer -keystore client.ks
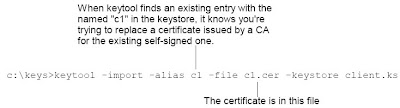
Run it
To verify, you can list the entries in the keystore:
C:\keys>keytool -list -v -keystore client.ks
Your keystore contains 2 entries. One is trustedCertEntry which is the CA just generated and imported. The other one is c1's certificate. The picture below is the second Entry.
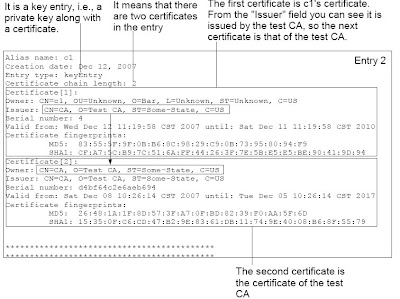
The first certificate is c1's certificate. From the "Issuer" field you can see it is
issued by the test CA, so the next certificate is that of the test CA.
A certificate chain is also called
"certificate path". If the certificate of your test CA was issued by yet another CA, then the certificate path would contain the certificate of that other CA as the last certificate.
-- excerpted from Developing Web Services with Apache Axis2
By Kent Ka Iok Tong
If you need trust your self-signed certificate on another machine, you need
- export the certificate
- copy the certificate to the other machine
- import the certificate there
To export the certificate, here is the sample command
keytool -export -alias tomcat -keystore .keystore -rfc -file ep.cer -storepass password
To import the certificate,
keytool -import -alias tomcat -file ep.cer -keystore cacerts -storepass changeit
If you did anything wrong, you can delete it from the keystore
keytool -delete -alias tomcat -keystore cacerts -storepass changeit


